🎯 How accurate is this analysis? AI estimate — tap to learn more ›
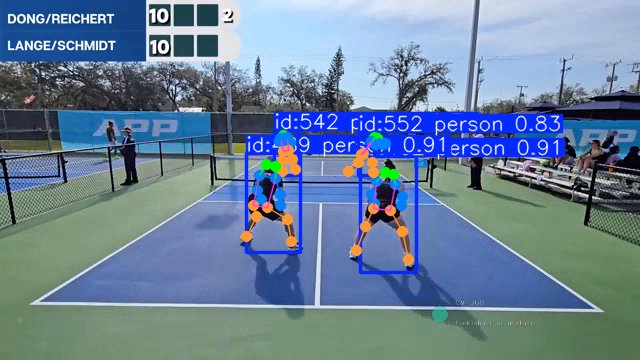
CV 360's AI watches every frame to estimate what happened on court. Think of it as a smart coaching assistant, not a precise measuring tool — how accurate it is depends a lot on your footage.
- Players detected & court-coverage heatmap
- Active-play % and rally count
- Overall shot volume & shot mix (soft vs hard)
- Exact shot labels (serve / dink / drive)
- Ball speed (mph) & precise timestamps
- Skill / DUPR band — a single-video guess, not an official rating
- One steady camera behind the baseline, framing a single court
- Use a tripod — avoid shaky or moving shots
- Record in the highest resolution you can (1080p or better)
- Keep other courts & crowds out of frame; even, bright lighting helps a lot
🏆 Performance Score
Score
🎯 CV 360 Skill Estimate
🦴 Body Mapping & Posture Analysis

🏋 Biomechanical Analysis
Active (90–145°): engaged hitting arm
Extended (>145°): full arm extension on drives
🕐 Shot Events Timeline
📍 Player Court Positioning
🎬 Scene Analysis
Detected video segments based on player presence and activity level
👥 Players Detected
🏓 Shot Analysis
🎯 3D Shot Viewer
Interactive 3D court visualization — drag to rotate · scroll to zoom · click a preset to snap to a view angle.
📊 Match Timeline
⚡ Auto Highlights
🗺 Performance Heatmaps
⚡ Ball Speed Analytics
🏠 Court Zone Dwell Time
🎾 Rally Analytics
| # | Start | Duration | Shots | Players |
|---|---|---|---|---|
| 1 | 00:25 | 3.8s | 5 | P1P2 |
| 2 | 00:38 | 8.87s | 9 | P1P2P3 |
| 3 | 00:50 | 5.07s | 7 | P2P3 |
| 4 | 01:00 | 1.26s | 3 | P1P4 |
| 5 | 01:09 | 1.9s | 4 | P2 |
| 6 | 01:19 | 5.07s | 8 | P1P2 |
| 7 | 01:28 | 0.64s | 2 | P2P4 |
| 8 | 01:31 | 1.9s | 2 | P2 |
| 9 | 01:39 | 4.44s | 6 | P2P3 |
| 10 | 02:06 | 1.26s | 3 | P2P3 |
| 11 | 02:14 | 1.27s | 3 | P1P3P4 |
| 12 | 02:23 | 3.17s | 4 | P1P2 |
| 13 | 02:42 | 3.8s | 7 | P1P2P3 |
| 14 | 02:51 | 0.63s | 2 | P2P3 |
| 15 | 02:55 | 3.8s | 5 | P1P3P4 |
| 16 | 03:56 | 0.64s | 2 | P3 |
| 17 | 04:01 | 2.54s | 5 | P1P3P4 |
| 18 | 04:39 | 0.64s | 2 | P2P3 |
| 19 | 04:46 | 0.63s | 2 | P2P3 |
| 20 | 04:54 | 1.9s | 3 | P2P3 |
| 21 | 05:00 | 0.63s | 2 | P2P4 |
| 22 | 05:18 | 1.26s | 3 | P2P4 |
| 23 | 05:36 | 0.63s | 2 | P2P4 |
| 24 | 05:42 | 0.64s | 2 | P3 |
| 25 | 05:46 | 0.64s | 2 | P2 |
| 26 | 05:53 | 6.33s | 8 | P1P2P3P4 |
| 27 | 06:10 | 3.17s | 6 | P3P4 |
| 28 | 06:23 | 0.63s | 2 | P2P4 |
| 29 | 06:29 | 3.17s | 3 | P1P3 |
| 30 | 06:37 | 0.64s | 2 | P2P4 |
| 31 | 06:44 | 1.26s | 3 | P1P3P4 |
| 32 | 06:54 | 4.43s | 7 | P1P2P3P4 |
| 33 | 07:01 | 2.53s | 4 | P2P4 |
| 34 | 07:16 | 2.53s | 3 | P2P4 |
| 35 | 08:29 | 7.6s | 7 | P1P2P3 |
| 36 | 08:57 | 4.43s | 4 | P1P4 |
| 37 | 09:11 | 0.64s | 2 | P1 |
| 38 | 09:50 | 1.9s | 4 | P1P2P3 |
| 39 | 10:00 | 7.6s | 9 | P2P3P4 |
| 40 | 10:32 | 2.53s | 5 | P1P2P4 |
| 41 | 10:39 | 3.8s | 7 | P1P2P3P4 |
| 42 | 10:47 | 0.63s | 2 | P2P4 |
| 43 | 11:43 | 2.54s | 3 | P1 |
| 44 | 11:59 | 1.9s | 3 | P1P4 |
| 45 | 12:18 | 0.63s | 2 | P2P4 |
| 46 | 12:26 | 0.63s | 2 | P1P4 |
| 47 | 12:31 | 1.9s | 2 | P1P2 |
| 48 | 12:45 | 1.26s | 3 | P2P3 |
| 49 | 13:12 | 5.7s | 9 | P1P2P3P4 |
| 50 | 13:26 | 0.64s | 2 | P2P4 |
⏱ Reaction Time Analysis
🤚 Swing Distribution
🎯 Error Analysis
💡 AI Coach Insight
Player 1 owned the kitchen (85.9% NVZ dwell) from center court — strong net pressure. Swing mix across 56 shots: forehand 76.8%, backhand 14.3%, overhead 0%, dink 8.9%. 🤚 Heavy forehand bias — train backhand Heavy forehand reliance — opponents will target the backhand wing. Drill cross-court backhand dinks. Reaction: avg 1369ms (fastest 630ms over 56 shots). ➖ Average reaction
Player 2 owned the kitchen (85.1% NVZ dwell) from center court — strong net pressure. Swing mix across 61 shots: forehand 90.2%, backhand 9.8%, overhead 0%, dink 0%. 🤚 Heavy forehand bias — train backhand Heavy forehand reliance — opponents will target the backhand wing. Drill cross-court backhand dinks. Reaction: avg 1063ms (fastest 630ms over 28 shots). ✅ Strong reaction
Player 3 owned the kitchen (92.1% NVZ dwell) from center court — strong net pressure. Swing mix across 28 shots: forehand 71.4%, backhand 28.6%, overhead 0%, dink 0%. 🤚 Heavy forehand bias — train backhand Reaction: avg 1283ms (fastest 630ms over 37 shots). ➖ Average reaction
Player 4 (Center Court): balanced court positioning — kitchen 27.8%, baseline 30.9%. Swing mix across 18 shots: forehand 88.9%, backhand 11.1%, overhead 0%, dink 0%. 🤚 Heavy forehand bias — train backhand Heavy forehand reliance — opponents will target the backhand wing. Drill cross-court backhand dinks. Reaction: avg 1459ms (fastest 630ms over 26 shots). ➖ Average reaction
Whole-match summary
Moderate-intensity session (58% active play, 4 player(s)). Increasing rally tempo will build match conditioning. Shot profile: 56% volleys. Dinks: 27 · Drives: 39 · Drops: 2 · Volleys: 161. Consistent pace (avg ≈1 mph, max ≈3 mph est.). Developing a harder drive on short balls would create more winning opportunities. 65 rallies detected — longest 266 frames, averaging ~4.4 shots/rally. Long rallies indicate strong consistency — focus on speed-up opportunities to close out points. Biomechanics: knees nearly straight 47.4% of the time. Bend knees to 130–160° for better balance and explosive lateral movement. Top moment: "Rally #1" at 1s. Keep logging your sessions to build a long-term performance profile.
📊 Statistics
Upload a video or record live — CV 360's AI breaks down every shot, rally, and movement in minutes.
Get Started Free →